USERMANUALS FOR ETU UNITS | Delta-armory.com

Logistic warehouse in Central European - we ship to whole European Union

Official website of Delta Armory Airsoft Brand

Free shipping for orders over 250 €

magnify Search

heart0Favourites

en

USERMANUALS FOR ETU UNITS

EAGLE ETU USER MANUALS icon

icon ETU V1 USER MANUALS

  • OPERATION MANUAL FOR EAGLE OPTICAL ETUarrow

    BEFORE FIRST USE restore to factory settings and set up trigger:


    1. Restore factory settings


    •     Make sure the selector is in SAFE mode before connecting

    • Pull the trigger to the bottom in SAFE mode, please do not press hard on the trigger.


    • Connect the battery when pull the trigger, after the connect prompt, wait for 5 seconds, after a “beep” sounds, it means the restore factory settings is success.


    Note: After restoring factory settings, the trigger can be used normally only after setting up.
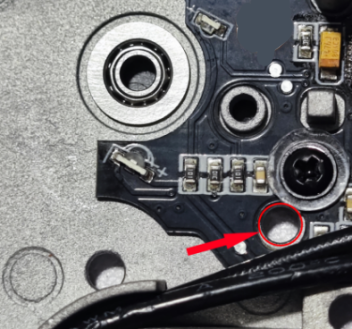
      Every installation of the ETU requires restoring factory settings and resetting the trigger.


    2. Set up the trigger before use

    • Make sure the selector is in SAFE mode before  connecting.

    • Connect battery in SAFE mode.


    • No action is required after the connect prompt, wait for 3 seconds and a "beep" prompt, wait for 3 seconds and a "beep"sound will appear.     


    • Pull the trigger to the bottom for 5 seconds. When a “beep” sounds appears, it means the activation is successful.


    Function options and
    Save


    1. Turn the selector twice from "AUTO" to "SEMI" and enter the program selection in "SEMI" mode.


    2. Pull the trigger under "SEMI" mode to switch the "SEMI" position.


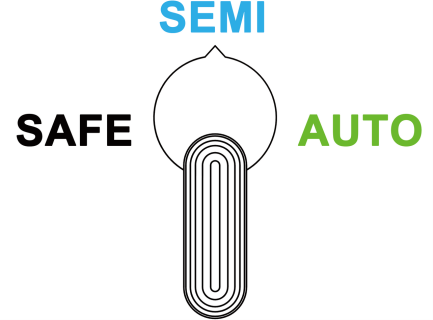
    3. After selecting the mode of “SEMI”, turn the selector to the “AUTO” mode Pull the trigger under "AUTO" mode to switch the mode, select the required program, and long press the trigger under "AUTO" mode for 3 seconds to save the program.


    4. After enter the program under “SEMI” position, pull the trigger under “SEMI” position to switch the selective type, pull the trigger after selector turn to “AUTO” position to select type. After selecting the required mode, if you didn’t long press trigger to save the program, the selector will back to “SEMI” position, and the selected mode under “AUTO” position will be pre-stored. Selector turn back to the “SEMI” position, you can continue to pull the trigger to adjust the next shooting mode, and finally long press the trigger under “AUTO” position to save all the selected modes. You can select and save multiple functions at once.


    AUTO Shooting mode

    • AUTO
    • SEMI
    • Burst 3:Pull the trigger once will shoot 3 times.
    • Burst 5:Pull the trigger once will shoot 5 times.


    SEMI Shooting mode

    • SEMI 
    • Binary:pull the trigger to the bottom will shoot one time and release the trigger will shoot one time
    • Pull the trigger to 20% is “SEMI” mode; Pull the trigger to 20% is “SEMI” mode; 

    Sniper:Wait for 2 seconds for each shot. After 2 seconds, there will be a "beep" sound indicating that it can be shot.
    Special suggestion: The AUG mode requires the trigger screw to be adjusted to a completely unrestricted state for normal use.
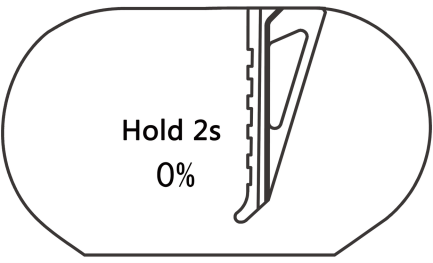


    TRIGGER mode

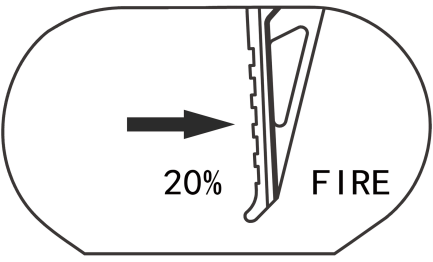
    • 20%:Pull the trigger 20% to shoot.


    • 40%:Pull the trigger 40% to shoot.


    • 60%:Pull the trigger 60% to shoot.


    • 80%:Pull the trigger 80% to shoot.


    • 100%:Pull the trigger 100% to shoot.


    Special suggestion: The screw inside the trigger can adjust the distance. The distance of the trigger can be adjusted according to the selected mode for better trigger sensitivity.
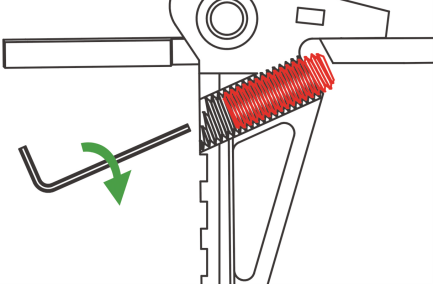


    Pre-cocking mode

    1. Level 1:The piston stop position is 1st gear. 


    2. Level 2:The piston stop position is 2nd gear.


    3. Level 3:The piston stop position is 3rd gear. 


    4. Level 4:The piston stop position is 4th gear.


    5. Level 5:The piston stop position is 5th gear. 


    6. Level 6:The piston stop position is 6th gear.


    Active brake

    1. Active brake - ON
    2. Active brake - OFF

    Please turn off “Active brake” when using the brushless motor


  • INSTALLATION MANUAL FOR EAGLE OPTICAL ETU UNITarrow

    Pack list and specification:


    Voltage range:5.0V-15.5V                  

        Electricity:17mA
    Size (L x W x H):44x29x8mm                  Weight:24.5g
    Applicable temperature:-10 - 50℃               Relative humidity:≤70%


    Protection and alarm

    1. Low voltage protection: If the instantaneous voltage drops below 5.0V, the battery will be automatically power off to protect it and an alarm will be issued.
    2. High voltage protection: If the voltage exceeds 15.5V, the battery will be automatically power off to protect it and an alarm will be issued.
    3. Overload protection: If the shooting speed exceeds 40 RPS, it will automatically power off to protect the hardware of the gearbox from damage and an alarm will be issued.
    4. Abnormal protection: When the gearbox hardware is damaged or unable to operate normally, it will automatically power off for protection and an alarm will be issued.

    Alarm prompt: After an abnormal situation occurs, there will be an alarm prompt that displays as three times consecutive motor vibration


    Product features and precautions

    • EAGLE ETU using magnetic trigger with light gear detection, which can achieve diversified customization functions. It has the advantages of high sensitivity, long service life, and less affected by external interference.
      It can be adapted to brushless motors.
    • Turn the selection button to the SAFE position to enter standby mode, which can minimize battery consumption. Please disconnect the battery promptly when not in use. In standby mode, the ETU will continuously consume a very small amount of battery power, and the battery will be empty if not disconnect for a long time, which will cause battery damaged.
    • Suggest using 11.1V LiPo batteries.
    • To install EAGLE ETU, it is necessary to be familiar with and understand the internal structure of the gearbox. To avoid damage or incorrect installation of the ETU during the installation process, it is recommended to have professional technical personnel install the ETU.
    • Pay attention to protecting the wires from damage or damage during installation.
    • Please read the manual carefully before installing the ETU to avoid damage the ETU.
    • Incorrect installation or incorrect connection of the battery can cause a short circuit and result in instantaneous damage to the ETU, which is not covered by the warranty.


    Installation instructions


    1. The image below shows the optical element of the EAGLE ETU. Please note that the optical element should not be contaminated with oil during installation.  
      Contaminated with oil or damaged of the element will affect the use of the ETU.


    2. To avoid the teeth touching the light element during operation, the thickness of the spacer at the bottom of the teeth should not be less than 0.7mm.


    3. Please adjust the position of the ETU before fixing the lock screw. The ETU and the bearing must always maintain a concentric distance, as indicated by the red mark. 


    4. When fixing ETU with screws, 0.7mm insulated spacer must be added to prevent ETU from being damaged by screws.


    5. If the gap between trigger and gearbox shell is large, the trigger Wobble seriously will affect the use of the ETU, you can add a 6 x 0.2mm or 0.3mm trigger spacer on the trigger shaft to reduce the gap wobble.


    6. The position indicated by the arrow is a pin hole. Please confirm this hole is not covered by wires or others.


    7. Please apply the gear set with a small amount of grease, if too much lubrication may splash on the light sensor which will affecting the use of ETU.


  • OPERATION MANUAL FOR ETU V.1 - ETU SERIESarrow

    Press and hold the trigger on semi-auto until you hear a beep.

    The weapon starts beeping and gives us a choice between individual branches of the programming tree (one beep is first branch, two beeps is second branch, three beeps is third branch).

    When we want to program the options in the first branch, after one beep of the gun press and hold  the trigger and we should hear the sound signal again.

    In the first branch, we have a choice of two options (one beep semi-auto  in semi mode, two beeps binary in semi mode. In this mode the weapon will fire when the trigger is pressed and when it is released). When we decide to set, for example, binary to semi, then after two beeps of the weapon, we have to hold the trigger until the sound signal is heard (2 beeps of the weapon).

    In this way, the weapon lets us know that our selection is confirmed and the setting is saved.

    The same applies to programming in the second branch, only there we decide between full-auto shooting in full auto weapon mode, and 3-round burst in full auto weapon mode (the weapon fires only 3 shots in full auto mode, then it is necessary again press the trigger to fire 3 shots again).

    For programming in the third branch, the gun gives us a choice of 5 spring precocking options (1-beep, the weakest spring precocking, 5-beep, the strongest - thanks to the spring precocking, we get a faster response of the weapon to pressing the trigger).

    However, some weapon models can fire 2 shots in semi mode with the strongest precocking setting of the spring. This is due to too much precock and mechanically the weapon cannot catch the piston in this position, so you must fix this problem by reducing the precocking setting to level 4.

    WARNING! When pre-tensioning the spring, it must be released after the game so that it does not weaken, by being comprest for a long period of time.

    How to do it ? We switch the weapon to full auto mode and fire a few shots, this way it releases the spring and the weapon is ready for storage.

    Other sound signaling of the ETU unit:

    3 beeps - Battery connected
    4 beeps - Critically low battery voltage. ETU doesn't stop whistling.
    1 short beep - ETU unit is overheated
    1 long beep - It is not possible to complete the cycle (blocked motor, unregistered wheel rotation, very low battery voltage, etc.)


  • INSTALLATION MANUAL FOR ETU V.1 UNITarrow